|
|
|
|
|
|
|
|
|
|
|
[](http://choosealicense.com/licenses/mit/)
|
|
|
|
|
|
> English | [中文](README-CN.md)
|
|
|
|
|
|
## Features
|
|
|
🌍 **Chinese** supported mandarin and tested with multiple datasets: aidatatang_200zh, magicdata, aishell3, data_aishell, and etc.
|
|
|
|
|
|
🤩 **PyTorch** worked for pytorch, tested in version of 1.9.0(latest in August 2021), with GPU Tesla T4 and GTX 2060
|
|
|
|
|
|
🌍 **Windows + Linux** run in both Windows OS and linux OS (even in M1 MACOS)
|
|
|
|
|
|
🤩 **Easy & Awesome** effect with only newly-trained synthesizer, by reusing the pretrained encoder/vocoder
|
|
|
|
|
|
🌍 **Webserver Ready** to serve your result with remote calling
|
|
|
|
|
|
### [DEMO VIDEO](https://www.bilibili.com/video/BV17Q4y1B7mY/)
|
|
|
|
|
|
### Ongoing Works(Helps Needed)
|
|
|
* Major upgrade on GUI/Client and unifying web and toolbox
|
|
|
[X] Init framework `./mkgui` and [tech design](https://vaj2fgg8yn.feishu.cn/docs/doccnvotLWylBub8VJIjKzoEaee)
|
|
|
[X] Add demo part of Voice Cloning and Conversion
|
|
|
[X] Add preprocessing and training for Voice Conversion
|
|
|
[ ] Add preprocessing and training for Encoder/Synthesizer/Vocoder
|
|
|
* Major upgrade on model backend based on ESPnet2(not yet started)
|
|
|
|
|
|
## Quick Start
|
|
|
|
|
|
### 1. Install Requirements
|
|
|
#### 1.1 General Setup
|
|
|
> Follow the original repo to test if you got all environment ready.
|
|
|
**Python 3.7 or higher ** is needed to run the toolbox.
|
|
|
|
|
|
* Install [PyTorch](https://pytorch.org/get-started/locally/).
|
|
|
> If you get an `ERROR: Could not find a version that satisfies the requirement torch==1.9.0+cu102 (from versions: 0.1.2, 0.1.2.post1, 0.1.2.post2 )` This error is probably due to a low version of python, try using 3.9 and it will install successfully
|
|
|
* Install [ffmpeg](https://ffmpeg.org/download.html#get-packages).
|
|
|
* Run `pip install -r requirements.txt` to install the remaining necessary packages.
|
|
|
* Install webrtcvad `pip install webrtcvad-wheels`(If you need)
|
|
|
|
|
|
or
|
|
|
- install dependencies with `conda` or `mamba`
|
|
|
|
|
|
```conda env create -n env_name -f env.yml```
|
|
|
|
|
|
```mamba env create -n env_name -f env.yml```
|
|
|
|
|
|
will create a virtual environment where necessary dependencies are installed. Switch to the new environment by `conda activate env_name` and enjoy it.
|
|
|
> env.yml only includes the necessary dependencies to run the project,temporarily without monotonic-align. You can check the official website to install the GPU version of pytorch.
|
|
|
|
|
|
#### 1.2 Setup with a M1 Mac
|
|
|
> The following steps are a workaround to directly use the original `demo_toolbox.py`without the changing of codes.
|
|
|
>
|
|
|
> Since the major issue comes with the PyQt5 packages used in `demo_toolbox.py` not compatible with M1 chips, were one to attempt on training models with the M1 chip, either that person can forgo `demo_toolbox.py`, or one can try the `web.py` in the project.
|
|
|
|
|
|
##### 1.2.1 Install `PyQt5`, with [ref](https://stackoverflow.com/a/68038451/20455983) here.
|
|
|
* Create and open a Rosetta Terminal, with [ref](https://dev.to/courier/tips-and-tricks-to-setup-your-apple-m1-for-development-547g) here.
|
|
|
* Use system Python to create a virtual environment for the project
|
|
|
```
|
|
|
/usr/bin/python3 -m venv /PathToMockingBird/venv
|
|
|
source /PathToMockingBird/venv/bin/activate
|
|
|
```
|
|
|
* Upgrade pip and install `PyQt5`
|
|
|
```
|
|
|
pip install --upgrade pip
|
|
|
pip install pyqt5
|
|
|
```
|
|
|
##### 1.2.2 Install `pyworld` and `ctc-segmentation`
|
|
|
|
|
|
> Both packages seem to be unique to this project and are not seen in the original [Real-Time Voice Cloning](https://github.com/CorentinJ/Real-Time-Voice-Cloning) project. When installing with `pip install`, both packages lack wheels so the program tries to directly compile from c code and could not find `Python.h`.
|
|
|
|
|
|
* Install `pyworld`
|
|
|
* `brew install python` `Python.h` can come with Python installed by brew
|
|
|
* `export CPLUS_INCLUDE_PATH=/opt/homebrew/Frameworks/Python.framework/Headers` The filepath of brew-installed `Python.h` is unique to M1 MacOS and listed above. One needs to manually add the path to the environment variables.
|
|
|
* `pip install pyworld` that should do.
|
|
|
|
|
|
|
|
|
* Install`ctc-segmentation`
|
|
|
> Same method does not apply to `ctc-segmentation`, and one needs to compile it from the source code on [github](https://github.com/lumaku/ctc-segmentation).
|
|
|
* `git clone https://github.com/lumaku/ctc-segmentation.git`
|
|
|
* `cd ctc-segmentation`
|
|
|
* `source /PathToMockingBird/venv/bin/activate` If the virtual environment hasn't been deployed, activate it.
|
|
|
* `cythonize -3 ctc_segmentation/ctc_segmentation_dyn.pyx`
|
|
|
* `/usr/bin/arch -x86_64 python setup.py build` Build with x86 architecture.
|
|
|
* `/usr/bin/arch -x86_64 python setup.py install --optimize=1 --skip-build`Install with x86 architecture.
|
|
|
|
|
|
##### 1.2.3 Other dependencies
|
|
|
* `/usr/bin/arch -x86_64 pip install torch torchvision torchaudio` Pip installing `PyTorch` as an example, articulate that it's installed with x86 architecture
|
|
|
* `pip install ffmpeg` Install ffmpeg
|
|
|
* `pip install -r requirements.txt` Install other requirements.
|
|
|
|
|
|
##### 1.2.4 Run the Inference Time (with Toolbox)
|
|
|
> To run the project on x86 architecture. [ref](https://youtrack.jetbrains.com/issue/PY-46290/Allow-running-Python-under-Rosetta-2-in-PyCharm-for-Apple-Silicon).
|
|
|
* `vim /PathToMockingBird/venv/bin/pythonM1` Create an executable file `pythonM1` to condition python interpreter at `/PathToMockingBird/venv/bin`.
|
|
|
* Write in the following content:
|
|
|
```
|
|
|
#!/usr/bin/env zsh
|
|
|
mydir=${0:a:h}
|
|
|
/usr/bin/arch -x86_64 $mydir/python "$@"
|
|
|
```
|
|
|
* `chmod +x pythonM1` Set the file as executable.
|
|
|
* If using PyCharm IDE, configure project interpreter to `pythonM1`([steps here](https://www.jetbrains.com/help/pycharm/configuring-python-interpreter.html#add-existing-interpreter)), if using command line python, run `/PathToMockingBird/venv/bin/pythonM1 demo_toolbox.py`
|
|
|
|
|
|
|
|
|
### 2. Prepare your models
|
|
|
> Note that we are using the pretrained encoder/vocoder but not synthesizer, since the original model is incompatible with the Chinese symbols. It means the demo_cli is not working at this moment, so additional synthesizer models are required.
|
|
|
|
|
|
You can either train your models or use existing ones:
|
|
|
|
|
|
#### 2.1 Train encoder with your dataset (Optional)
|
|
|
|
|
|
* Preprocess with the audios and the mel spectrograms:
|
|
|
`python encoder_preprocess.py <datasets_root>` Allowing parameter `--dataset {dataset}` to support the datasets you want to preprocess. Only the train set of these datasets will be used. Possible names: librispeech_other, voxceleb1, voxceleb2. Use comma to sperate multiple datasets.
|
|
|
|
|
|
* Train the encoder: `python encoder_train.py my_run <datasets_root>/SV2TTS/encoder`
|
|
|
> For training, the encoder uses visdom. You can disable it with `--no_visdom`, but it's nice to have. Run "visdom" in a separate CLI/process to start your visdom server.
|
|
|
|
|
|
#### 2.2 Train synthesizer with your dataset
|
|
|
* Download dataset and unzip: make sure you can access all .wav in folder
|
|
|
* Preprocess with the audios and the mel spectrograms:
|
|
|
`python pre.py <datasets_root>`
|
|
|
Allowing parameter `--dataset {dataset}` to support aidatatang_200zh, magicdata, aishell3, data_aishell, etc.If this parameter is not passed, the default dataset will be aidatatang_200zh.
|
|
|
|
|
|
* Train the synthesizer:
|
|
|
`python synthesizer_train.py mandarin <datasets_root>/SV2TTS/synthesizer`
|
|
|
|
|
|
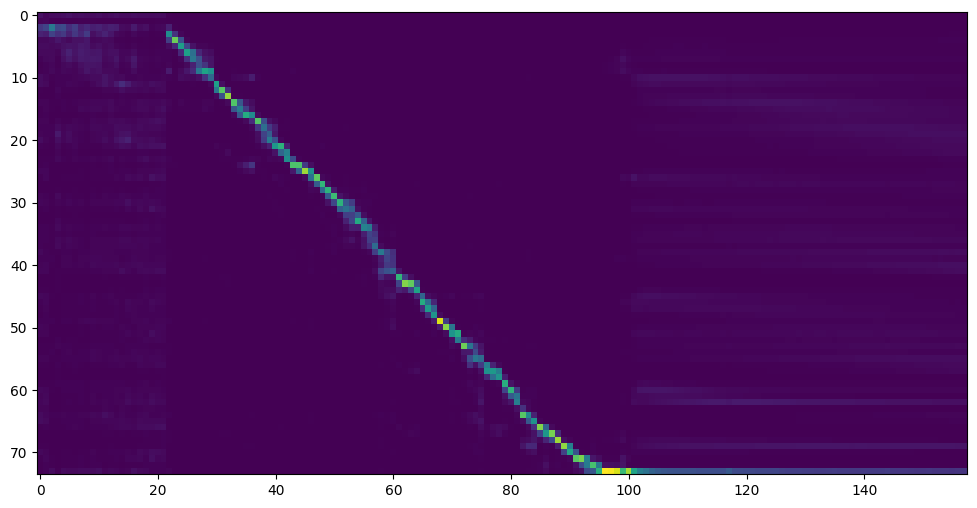
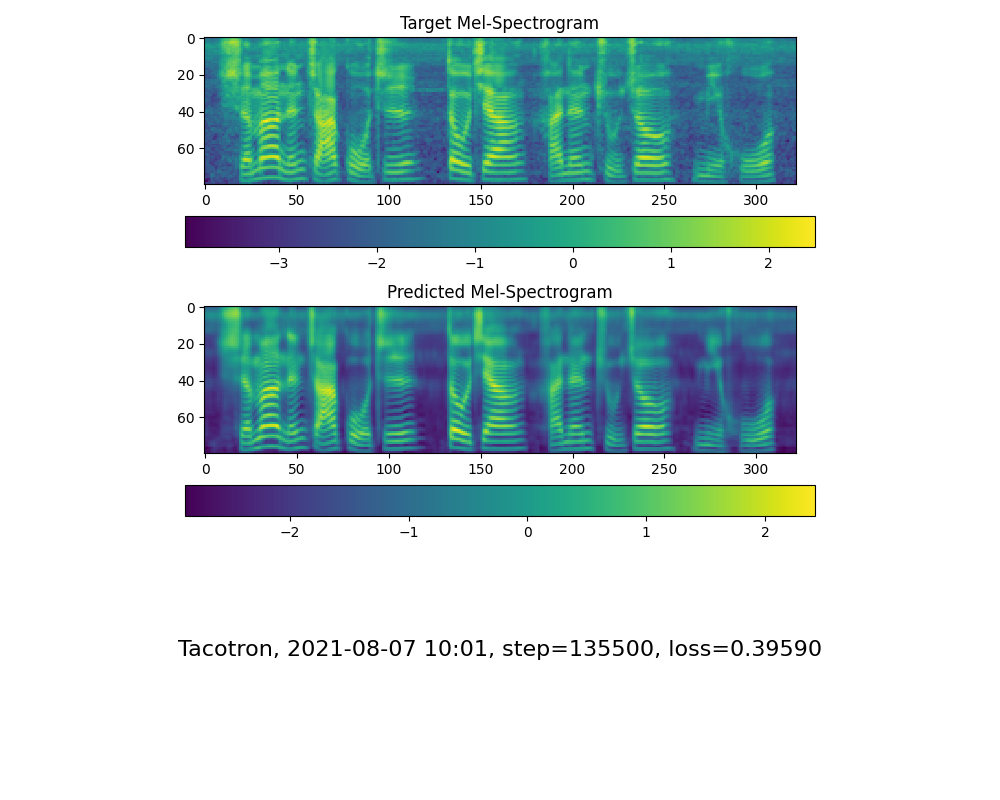
* Go to next step when you see attention line show and loss meet your need in training folder *synthesizer/saved_models/*.
|
|
|
|
|
|
#### 2.3 Use pretrained model of synthesizer
|
|
|
> Thanks to the community, some models will be shared:
|
|
|
|
|
|
| author | Download link | Preview Video | Info |
|
|
|
| --- | ----------- | ----- |----- |
|
|
|
| @author | https://pan.baidu.com/s/1iONvRxmkI-t1nHqxKytY3g [Baidu](https://pan.baidu.com/s/1iONvRxmkI-t1nHqxKytY3g) 4j5d | | 75k steps trained by multiple datasets
|
|
|
| @author | https://pan.baidu.com/s/1fMh9IlgKJlL2PIiRTYDUvw [Baidu](https://pan.baidu.com/s/1fMh9IlgKJlL2PIiRTYDUvw) code:om7f | | 25k steps trained by multiple datasets, only works under version 0.0.1
|
|
|
|@FawenYo | https://drive.google.com/file/d/1H-YGOUHpmqKxJ9FRc6vAjPuqQki24UbC/view?usp=sharing https://u.teknik.io/AYxWf.pt | [input](https://github.com/babysor/MockingBird/wiki/audio/self_test.mp3) [output](https://github.com/babysor/MockingBird/wiki/audio/export.wav) | 200k steps with local accent of Taiwan, only works under version 0.0.1
|
|
|
|@miven| https://pan.baidu.com/s/1PI-hM3sn5wbeChRryX-RCQ code: 2021 https://www.aliyundrive.com/s/AwPsbo8mcSP code: z2m0 | https://www.bilibili.com/video/BV1uh411B7AD/ | only works under version 0.0.1
|
|
|
|
|
|
#### 2.4 Train vocoder (Optional)
|
|
|
> note: vocoder has little difference in effect, so you may not need to train a new one.
|
|
|
* Preprocess the data:
|
|
|
`python vocoder_preprocess.py <datasets_root> -m <synthesizer_model_path>`
|
|
|
> `<datasets_root>` replace with your dataset root,`<synthesizer_model_path>`replace with directory of your best trained models of sythensizer, e.g. *sythensizer\saved_mode\xxx*
|
|
|
|
|
|
* Train the wavernn vocoder:
|
|
|
`python vocoder_train.py mandarin <datasets_root>`
|
|
|
|
|
|
* Train the hifigan vocoder
|
|
|
`python vocoder_train.py mandarin <datasets_root> hifigan`
|
|
|
|
|
|
### 3. Launch
|
|
|
#### 3.1 Using the web server
|
|
|
You can then try to run:`python web.py` and open it in browser, default as `http://localhost:8080`
|
|
|
|
|
|
#### 3.2 Using the Toolbox
|
|
|
You can then try the toolbox:
|
|
|
`python demo_toolbox.py -d <datasets_root>`
|
|
|
|
|
|
#### 3.3 Using the command line
|
|
|
You can then try the command:
|
|
|
`python gen_voice.py <text_file.txt> your_wav_file.wav`
|
|
|
you may need to install cn2an by "pip install cn2an" for better digital number result.
|
|
|
|
|
|
## Reference
|
|
|
> This repository is forked from [Real-Time-Voice-Cloning](https://github.com/CorentinJ/Real-Time-Voice-Cloning) which only support English.
|
|
|
|
|
|
| URL | Designation | Title | Implementation source |
|
|
|
| --- | ----------- | ----- | --------------------- |
|
|
|
| [1803.09017](https://arxiv.org/abs/1803.09017) | GlobalStyleToken (synthesizer)| Style Tokens: Unsupervised Style Modeling, Control and Transfer in End-to-End Speech Synthesis | This repo |
|
|
|
| [2010.05646](https://arxiv.org/abs/2010.05646) | HiFi-GAN (vocoder)| Generative Adversarial Networks for Efficient and High Fidelity Speech Synthesis | This repo |
|
|
|
| [2106.02297](https://arxiv.org/abs/2106.02297) | Fre-GAN (vocoder)| Fre-GAN: Adversarial Frequency-consistent Audio Synthesis | This repo |
|
|
|
|[**1806.04558**](https://arxiv.org/pdf/1806.04558.pdf) | **SV2TTS** | **Transfer Learning from Speaker Verification to Multispeaker Text-To-Speech Synthesis** | This repo |
|
|
|
|[1802.08435](https://arxiv.org/pdf/1802.08435.pdf) | WaveRNN (vocoder) | Efficient Neural Audio Synthesis | [fatchord/WaveRNN](https://github.com/fatchord/WaveRNN) |
|
|
|
|[1703.10135](https://arxiv.org/pdf/1703.10135.pdf) | Tacotron (synthesizer) | Tacotron: Towards End-to-End Speech Synthesis | [fatchord/WaveRNN](https://github.com/fatchord/WaveRNN)
|
|
|
|[1710.10467](https://arxiv.org/pdf/1710.10467.pdf) | GE2E (encoder)| Generalized End-To-End Loss for Speaker Verification | This repo |
|
|
|
|
|
|
## F Q&A
|
|
|
#### 1.Where can I download the dataset?
|
|
|
| Dataset | Original Source | Alternative Sources |
|
|
|
| --- | ----------- | ---------------|
|
|
|
| aidatatang_200zh | [OpenSLR](http://www.openslr.org/62/) | [Google Drive](https://drive.google.com/file/d/110A11KZoVe7vy6kXlLb6zVPLb_J91I_t/view?usp=sharing) |
|
|
|
| magicdata | [OpenSLR](http://www.openslr.org/68/) | [Google Drive (Dev set)](https://drive.google.com/file/d/1g5bWRUSNH68ycC6eNvtwh07nX3QhOOlo/view?usp=sharing) |
|
|
|
| aishell3 | [OpenSLR](https://www.openslr.org/93/) | [Google Drive](https://drive.google.com/file/d/1shYp_o4Z0X0cZSKQDtFirct2luFUwKzZ/view?usp=sharing) |
|
|
|
| data_aishell | [OpenSLR](https://www.openslr.org/33/) | |
|
|
|
> After unzip aidatatang_200zh, you need to unzip all the files under `aidatatang_200zh\corpus\train`
|
|
|
|
|
|
#### 2.What is`<datasets_root>`?
|
|
|
If the dataset path is `D:\data\aidatatang_200zh`,then `<datasets_root>` is`D:\data`
|
|
|
|
|
|
#### 3.Not enough VRAM
|
|
|
Train the synthesizer:adjust the batch_size in `synthesizer/hparams.py`
|
|
|
```
|
|
|
//Before
|
|
|
tts_schedule = [(2, 1e-3, 20_000, 12), # Progressive training schedule
|
|
|
(2, 5e-4, 40_000, 12), # (r, lr, step, batch_size)
|
|
|
(2, 2e-4, 80_000, 12), #
|
|
|
(2, 1e-4, 160_000, 12), # r = reduction factor (# of mel frames
|
|
|
(2, 3e-5, 320_000, 12), # synthesized for each decoder iteration)
|
|
|
(2, 1e-5, 640_000, 12)], # lr = learning rate
|
|
|
//After
|
|
|
tts_schedule = [(2, 1e-3, 20_000, 8), # Progressive training schedule
|
|
|
(2, 5e-4, 40_000, 8), # (r, lr, step, batch_size)
|
|
|
(2, 2e-4, 80_000, 8), #
|
|
|
(2, 1e-4, 160_000, 8), # r = reduction factor (# of mel frames
|
|
|
(2, 3e-5, 320_000, 8), # synthesized for each decoder iteration)
|
|
|
(2, 1e-5, 640_000, 8)], # lr = learning rate
|
|
|
```
|
|
|
|
|
|
Train Vocoder-Preprocess the data:adjust the batch_size in `synthesizer/hparams.py`
|
|
|
```
|
|
|
//Before
|
|
|
### Data Preprocessing
|
|
|
max_mel_frames = 900,
|
|
|
rescale = True,
|
|
|
rescaling_max = 0.9,
|
|
|
synthesis_batch_size = 16, # For vocoder preprocessing and inference.
|
|
|
//After
|
|
|
### Data Preprocessing
|
|
|
max_mel_frames = 900,
|
|
|
rescale = True,
|
|
|
rescaling_max = 0.9,
|
|
|
synthesis_batch_size = 8, # For vocoder preprocessing and inference.
|
|
|
```
|
|
|
|
|
|
Train Vocoder-Train the vocoder:adjust the batch_size in `vocoder/wavernn/hparams.py`
|
|
|
```
|
|
|
//Before
|
|
|
# Training
|
|
|
voc_batch_size = 100
|
|
|
voc_lr = 1e-4
|
|
|
voc_gen_at_checkpoint = 5
|
|
|
voc_pad = 2
|
|
|
|
|
|
//After
|
|
|
# Training
|
|
|
voc_batch_size = 6
|
|
|
voc_lr = 1e-4
|
|
|
voc_gen_at_checkpoint = 5
|
|
|
voc_pad =2
|
|
|
```
|
|
|
|
|
|
#### 4.If it happens `RuntimeError: Error(s) in loading state_dict for Tacotron: size mismatch for encoder.embedding.weight: copying a param with shape torch.Size([70, 512]) from checkpoint, the shape in current model is torch.Size([75, 512]).`
|
|
|
Please refer to issue [#37](https://github.com/babysor/MockingBird/issues/37)
|
|
|
|
|
|
#### 5. How to improve CPU and GPU occupancy rate?
|
|
|
Adjust the batch_size as appropriate to improve
|
|
|
|
|
|
|
|
|
#### 6. What if it happens `the page file is too small to complete the operation`
|
|
|
Please refer to this [video](https://www.youtube.com/watch?v=Oh6dga-Oy10&ab_channel=CodeProf) and change the virtual memory to 100G (102400), for example : When the file is placed in the D disk, the virtual memory of the D disk is changed.
|
|
|
|
|
|
#### 7. When should I stop during training?
|
|
|
FYI, my attention came after 18k steps and loss became lower than 0.4 after 50k steps.
|
|
|
|
|
|
|