|
|
6 years ago | |
|---|---|---|
| .. | ||
| src/main | 6 years ago | |
| pom.xml | 6 years ago | |
| readme-zh.md | 6 years ago | |
| readme.md | 6 years ago | |
readme.md
Sentinel Example
Project Instruction
This example illustrates how to use Sentinel starter to implement flow control for Spring Cloud applications.
Sentinel is an open-source project of Alibaba. Sentinel takes "traffic flow" as the breakthrough point, and provides solutions in areas such as flow control, concurrency, circuit breaking, and load protection to protect service stability.
Demo
Connect to Sentinel
Before we start the demo, let's learn how to connect Sentinel to a Spring Cloud application. Note: This section is to show you how to connect to Sentinel. The configurations have been completed in the following example, so you don't need modify the code any more.
-
Add dependency spring-cloud-starter-alibaba-sentinel in the pom.xml file in your Spring Cloud project.
<dependency> <groupId>org.springframework.cloud</groupId> <artifactId>spring-cloud-starter-alibaba-sentinel</artifactId> </dependency> -
Define Resources
-
Define HTTP Resources
Sentinel starter defines all HTTP URLS as resources by relative paths. If you only want to add flow control for your HTTP services, you do not need to modify your code. -
Define Custom Resources
If you want to implement flow control or degradation for a specific method, you can add an @SentinelResource annotation to the method, as shown in the code below.@SentinelResource("resource") public String hello() { return "Hello"; }
-
-
Configure flow control rules
Sentinel provides two ways to configure flow control rules, init from code or configure by dashboard.
-
Init rule from code: See the code below for a simple flow rule. See Sentinel Docs for more information about flow rules.
List<FlowRule> rules = new ArrayList<FlowRule>(); FlowRule rule = new FlowRule(); rule.setResource(str); // set limit qps to 10 rule.setCount(10); rule.setGrade(RuleConstant.FLOW_GRADE_QPS); rule.setLimitApp("default"); rules.add(rule); FlowRuleManager.loadRules(rules); -
Config by dashboard: See the following section.
-
Start Sentinel Dashboard
-
Install Sentinel dashboard by downloading a fatjar or build from source code.
- Download: Download Sentinel Dashboard
- Build from source code: Get source code by
git clone git@github.com:alibaba/Sentinel.gitfrom Github Sentinel and build your code. See build reference for details.
-
Start the dashboard by running the
java -jar sentinel-dashboard.jarcommand. The default port of Sentinel dashboard is 8080. Sentinel dashboard is a Spring Boot project. If you want to use another port, see Spring Boot Reference.
Start Application
-
Add necessary configurations to file
/src/main/resources/application.properties.spring.application.name=sentinel-example server.port=18083 spring.cloud.sentinel.transport.dashboard=localhost:8080 -
Start the application in IDE or by building a fatjar.
- Start in IDE: Find main class
ServiceApplication, and execute the main method. - Build a fatjar:Execute command
mvn clean packageto build a fatjar,and run commandjava -jar sentinel-core-example.jarto start the application.
- Start in IDE: Find main class
Invoke Service
Execute command curl http://127.0.0.1:18083/hello
Execute command curl http://127.0.0.1:18083/test
The screenshot belows shows invoke success:

Configure Flow Control
-
Open http://localhost:8080 in browser, and you can find a Sentinel-Example Application has been registered to the dashboard.
Note: If you can't find your application in the dashboard, invoke a method that has been defined as a Sentinel Resource,for Sentinel uses lazy load strategy.
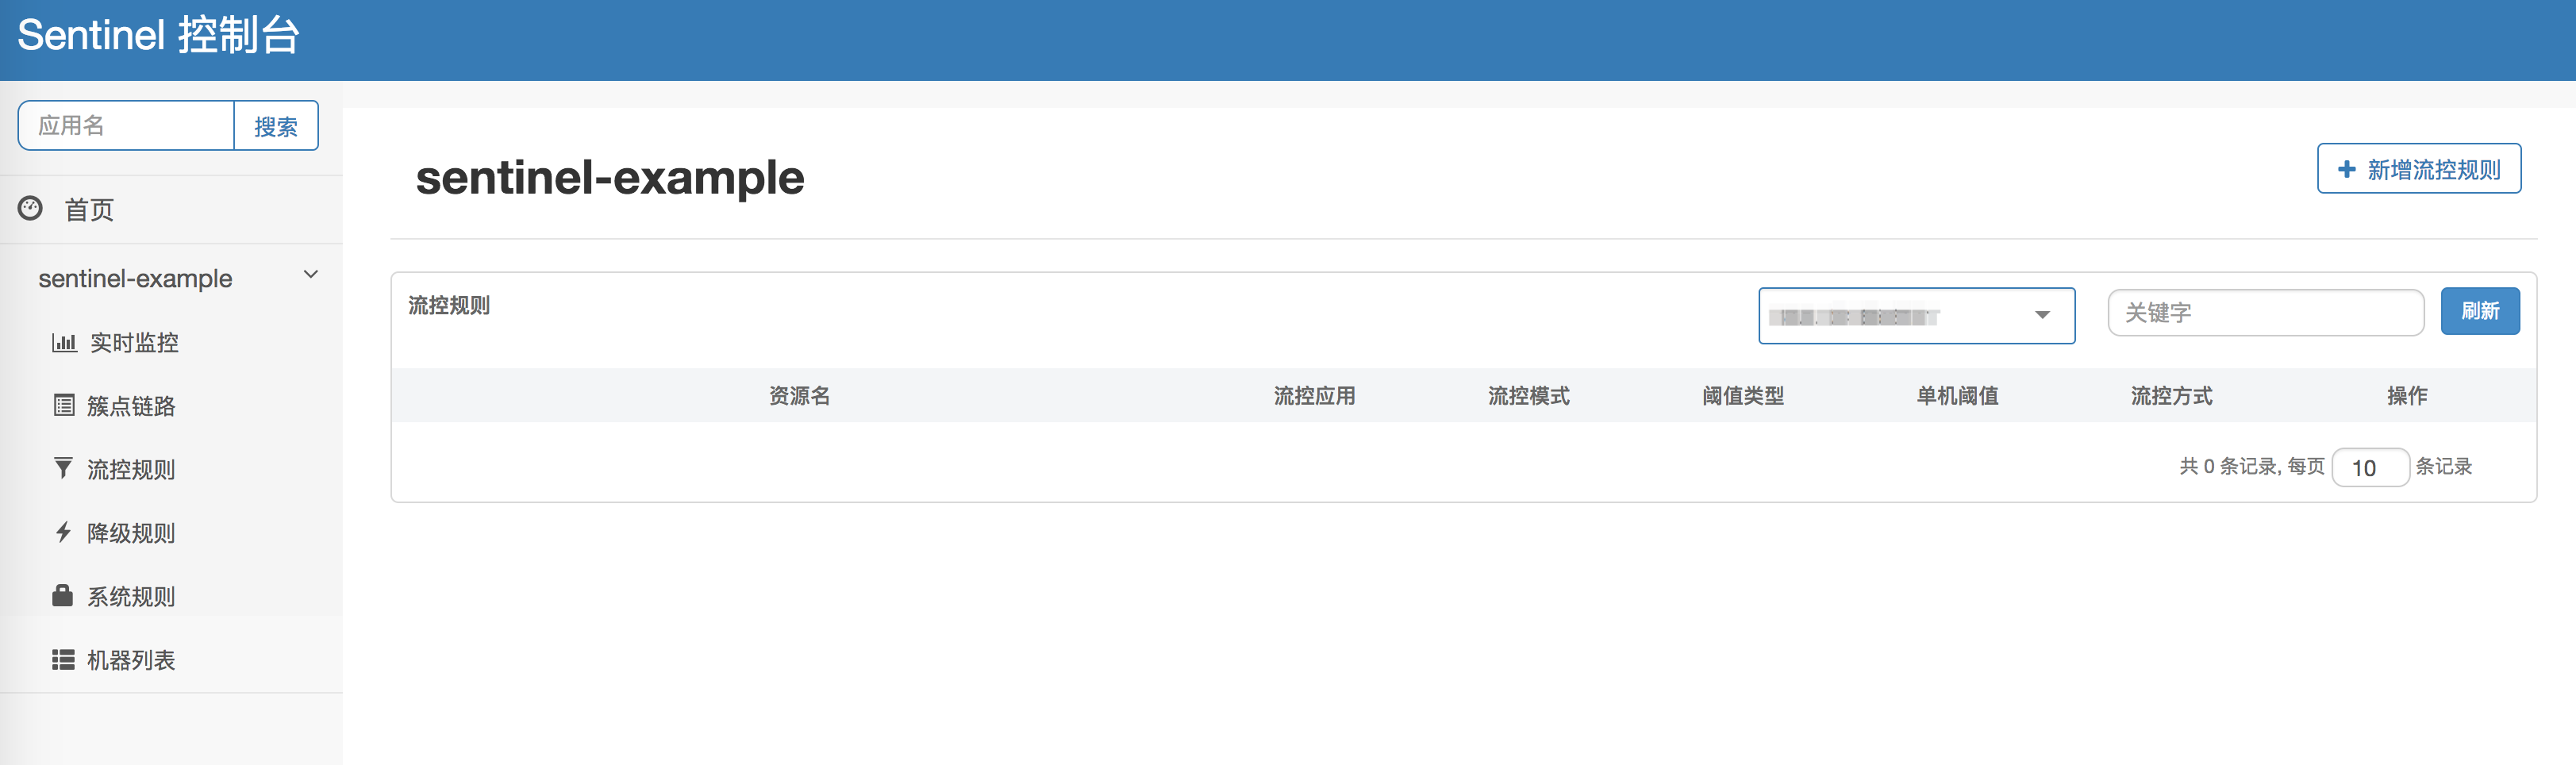
- Configure HTTP Resource Flow Rule:Click 流控规则(Flow Rule) on the left-side navigation pane and 新增流控规则(Create Flow Rule). On the Create Flow Rule dialogbox, type the URL relative path in the 资源名(Resource Name) field , enter 单机阈值(Threshold) value, then click 新增(OK). Here we set threshold to 1 for demonstration purpose.

- Configure Custom Resource Flow Rule:Click 流控规则(Flow Rule) on the left-side navigation pane and 新增流控规则(Create Flow Rule). type the value() of @SentinelResource in the 资源名(Resource Name) field , enter 单机阈值(Threshold) value, then click 新增(OK).Here we set threshold to 1 for demonstration purpose.

- Visit the URL in your browser again. When QPS is more than 1, we can see that flow control takes effect.


Customize Flow Control Logic
-
When a URL resource is blocked by Sentinel, the default logic is return HTTP response "Blocked by Sentinel (flow limiting)".
If you want to customize your flow control logic, see the code below:
public class CustomUrlBlockHandler implements UrlBlockHandler { @Override public void blocked(HttpServletRequest httpServletRequest, HttpServletResponse httpServletResponse) throws IOException { // todo add your logic } } WebCallbackManager.setUrlBlockHandler(new CustomUrlBlockHandler()); -
When a custom resource is blocked by Sentinel, the default logic is throw BlockException.
If you want to customize your flow control logic, implement interface
SentinelExceptionHandler, set @SentinelResource's blockHandler() and blockHandlerClass(). See the code below:@SentinelResource(value = "resource", blockHandler = "", blockHandlerClass = ExceptionUtil.class) public String hello() { return "Hello"; } // ExceptionUtil.java public class ExceptionUtil { public static void handleException(BlockException ex) { System.out.println("Oops: " + ex.getClass().getCanonicalName()); } }
Endpoint
Sentinel starter also supports the implementation of Spring Boot actuator endpoints.
Prerequisite:
Add dependency spring-boot-starter-actuator to your pom.xml file, and configure your endpoint security strategy.
- Spring Boot1.x: Add configuration
management.security.enabled=false - Spring Boot2.x: Add configuration
management.endpoints.web.exposure.include=*
To view the endpoint information, visit the following URLS:
- Spring Boot1.x: Sentinel Endpoint URL is http://127.0.0.1:18083/sentinel.
- Spring Boot2.x: Sentinel Endpoint URL is http://127.0.0.1:18083/actuator/sentinel.

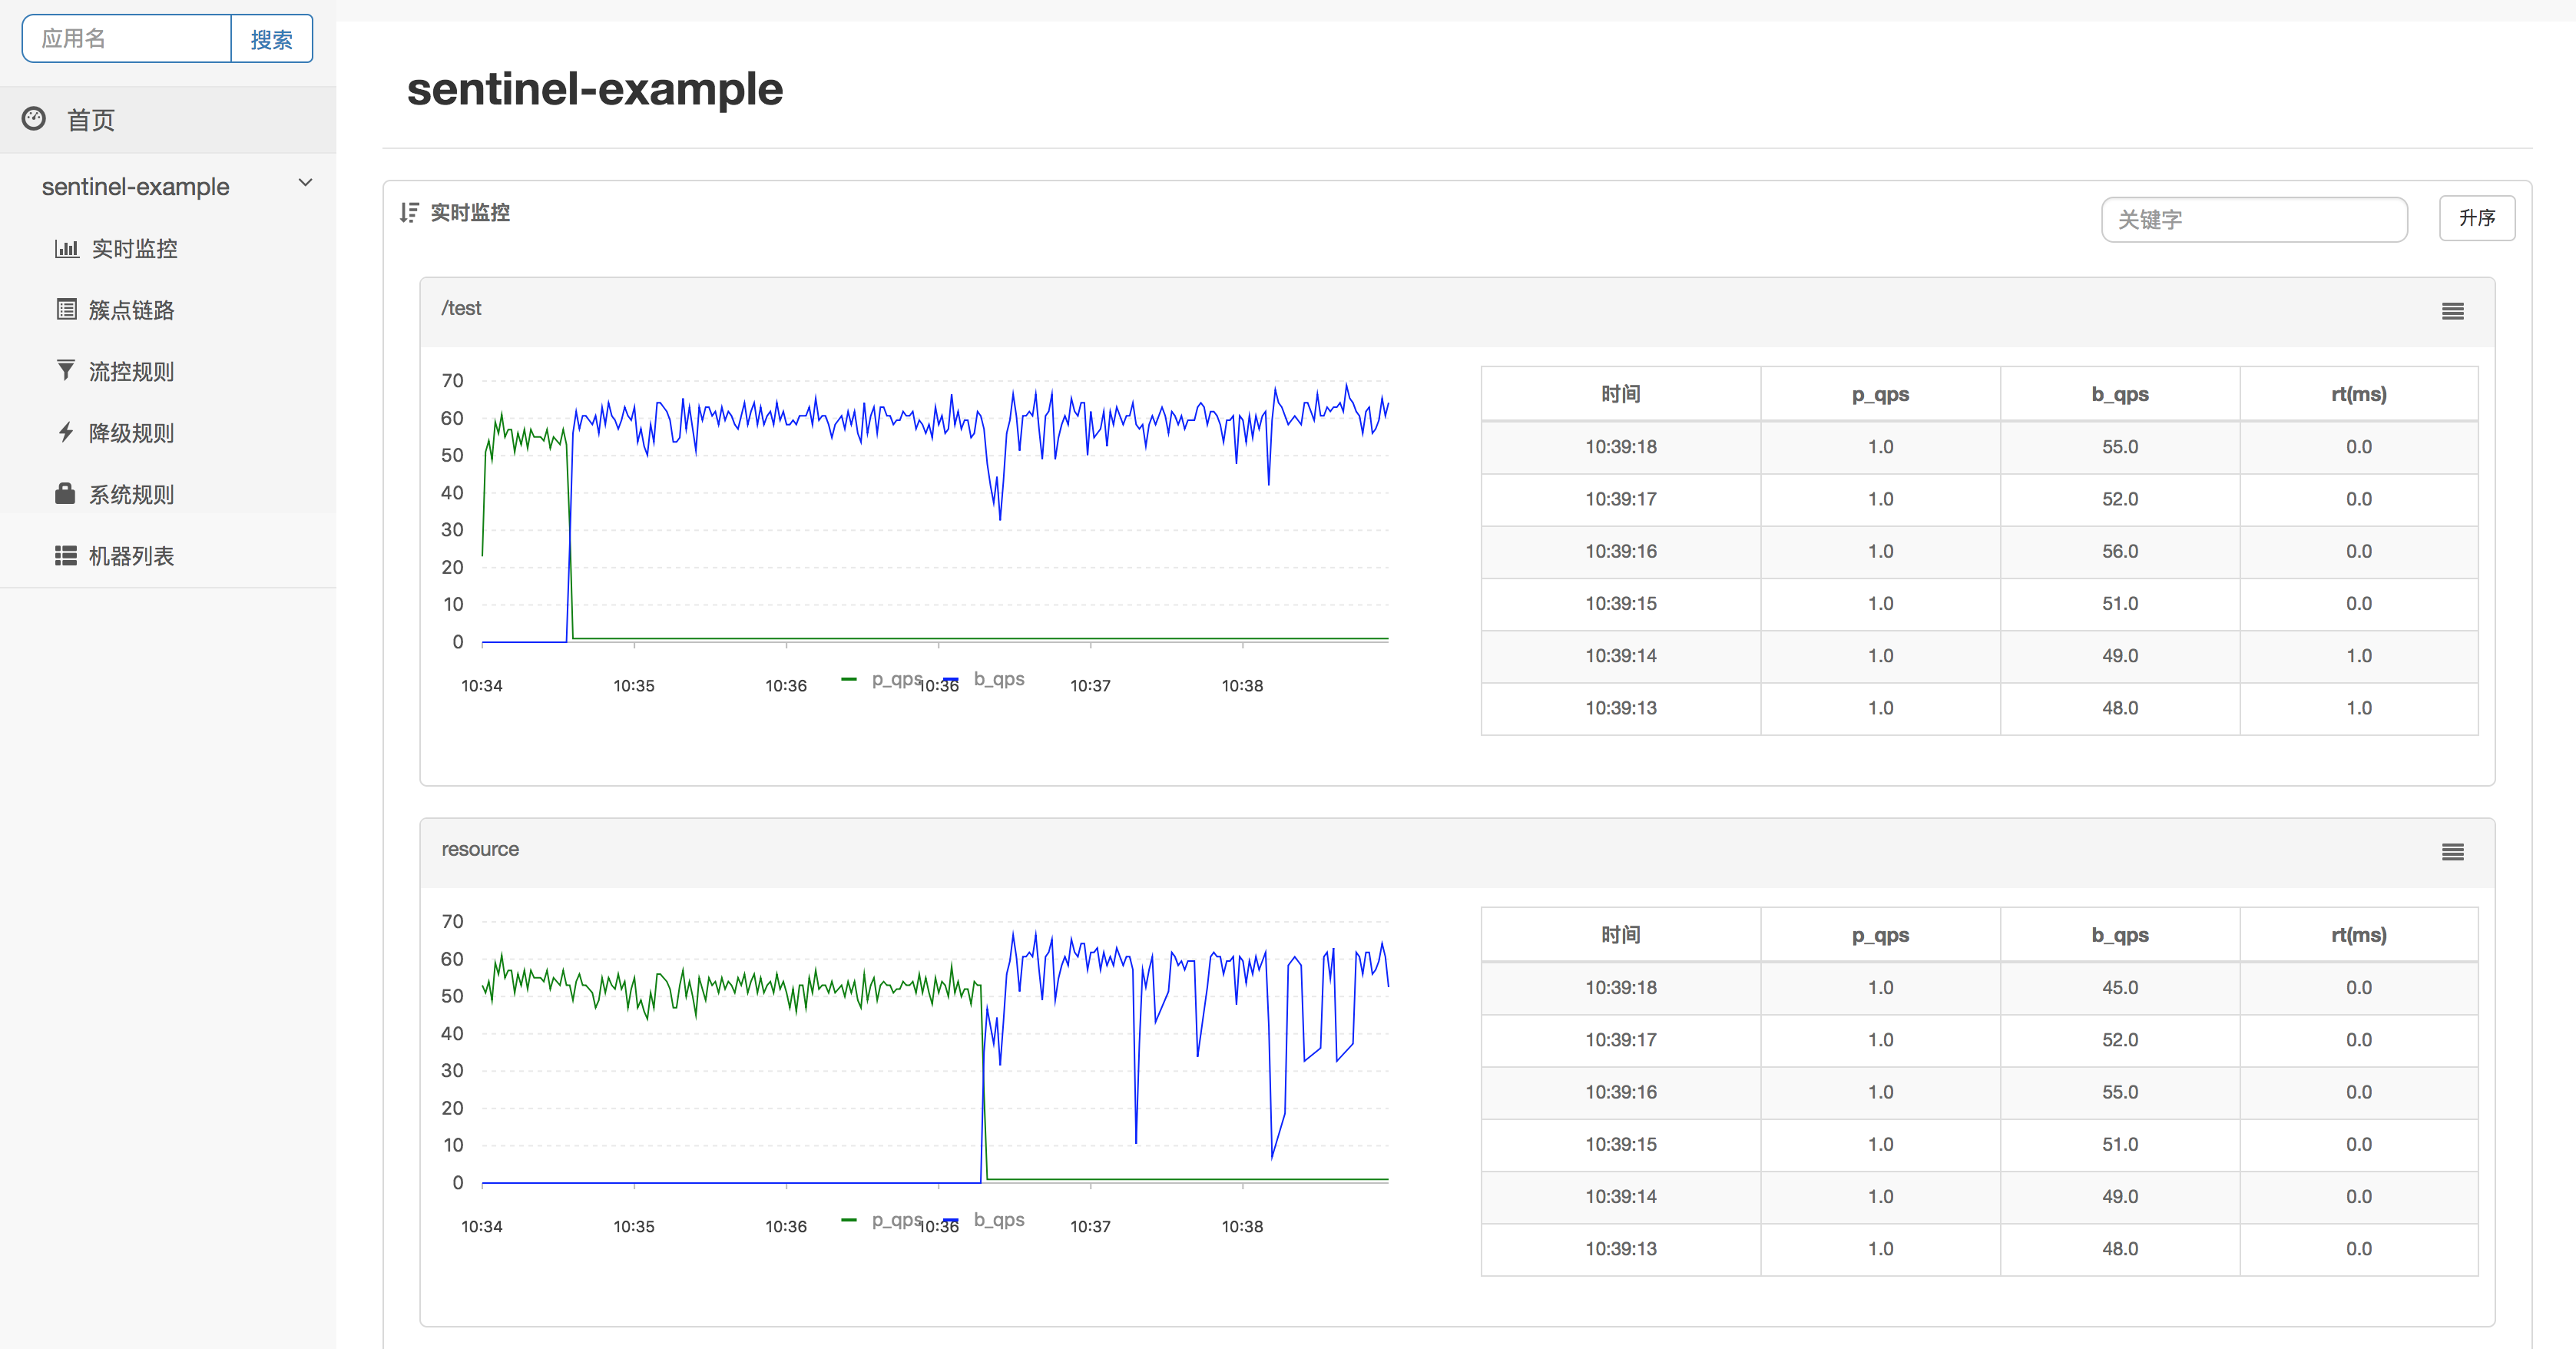
Metrics
You can view metrics information on Sentinel Dashboard.
To see the metrics, click 实时监控(Real-time Monitoring) in the left-side navigation pane.
p_qps stands for passed requests per second, b_qps stands for blocked requests per second.
ReadableDataSource
Sentinel provide ReadableDataSource to manage dynamic rules.
Sentinel starter integrated 4 DataSources provided by Sentinel. It will be register into Spring Context if you write some configs in application.properties.
If you want to define FileRefreshableDataSource:
spring.cloud.sentinel.datasource.type=file
spring.cloud.sentinel.datasource.recommendRefreshMs=2000
spring.cloud.sentinel.datasource.bufSize=2048
spring.cloud.sentinel.datasource.charset=utf-8
spring.cloud.sentinel.datasource.converter=myParser
spring.cloud.sentinel.datasource.file=/Users/you/rule.json
then use @SentinelDataSource to annotate DataSource:
@SentinelDataSource("spring.cloud.sentinel.datasource")
private ReadableDataSource dataSource;
The value() of @SentinelDataSource is not required, it means the prefix of configuration. Default value is spring.cloud.sentinel.datasource.
spring.cloud.sentinel.datasource.type means the type of DataSource.
spring.cloud.sentinel.datasource.recommendRefreshMs means the recommendRefreshMs property of specified DataSource.
spring.cloud.sentinel.datasource.converter means the name of spring bean that type is Converter. If the bean is not exists, will throw exception.
Now datasource type support 4 categories: file, nacos, zk, apollo. If you want to using nacos, zk or apollo, you should add sentinel-datasource-nacos, sentinel-datasource-zookeeper or sentinel-datasource-apollo dependency.
User-defined DataSource
User-defined DataSource need 2 steps.
-
Define DataSource
public class CustomDataSource implements ReadableDataSource { private String fieldA; private String fieldB; ... } -
Assemble DataSource. There are 2 ways to do this.
-
Construct DataSource directly
@Bean public CustomDataSource customDataSource() { CustomDataSource customDataSource = new CustomDataSource(); customDataSource.setFieldA("valueA"); customDataSource.setFieldB("valueB"); ... return customDataSource; } -
define DataSource metadata in
classpath:/META-INF/sentinel-datasource.propertiescustom = yourpackage.CustomDataSourcedefine configuration in
application.propertiesspring.cloud.sentinel.datasource.type = custom spring.cloud.sentinel.datasource.fieldA = valueA spring.cloud.sentinel.datasource.fieldB = valueB
-
Note: The AbstractDataSource of Sentinel need a Converter as a constructor param and the subclass of AbstractDataSource was construct by multi-param constructor. Now All DataSources in starter was construct by FactoryBean. If you want to do it in this way, you should register FactoryBean by SentinelDataSourceRegistry.
SentinelDataSourceRegistry.registerFactoryBean("custeom", CustomDataSourceFactoryBean.class);
It is no need to using SentinelDataSourceRegistry to register FactoryBean if your User-defined DataSource can inject fields.
More
For more information about Sentinel, see Sentinel Project.
If you have any ideas or suggestions for Spring Cloud Sentinel starter, please don't hesitate to tell us by submitting github issues.