# Nacos Discovery Example
## Project Instruction
This example illustrates how to use Nacos Discovery Starter implement Service discovery for Spring Cloud applications.
[Nacos](https://github.com/alibaba/Nacos) an easy-to-use dynamic service discovery, configuration and service management platform for building cloud native applications.
## Demo
### Connect to Nacos Discovery
Before we start the demo, let's learn how to connect Nacos Config to a Spring Cloud application. **Note: This section is to show you how to connect to Nacos Discovery. The configurations have been completed in the following example, so you don't need modify the code any more.**
1. Add dependency spring-cloud-starter-alibaba-nacos-discovery in the pom.xml file in your Spring Cloud project.
com.alibaba.cloud
spring-cloud-starter-alibaba-nacos-discovery
2. Add Nacos server address configurations to file /src/main/resources/application.properties.
spring.cloud.nacos.discovery.server-addr=127.0.0.1:8848
3. Use the @EnableDiscoveryClient annotation to turn on service registration and discovery.
@SpringBootApplication
@EnableDiscoveryClient
public class ProviderApplication {
public static void main(String[] args) {
SpringApplication.run(Application.class, args);
}
@RestController
class EchoController {
@GetMapping(value = "/echo/{string}")
public String echo(@PathVariable String string) {
return string;
}
}
}
### Start Nacos Server
1. Install Nacos Server by downloading or build from source code.**Recommended latest version Nacos Server**
1. Download: Download Nacos Server [download page](https://github.com/alibaba/nacos/releases)
2. Build from source code: Get source code by git clone git@github.com:alibaba/Nacos.git from Github Nacos and build your code. See [build reference](https://nacos.io/en-us/docs/quick-start.html) for details.
2. Unzip the downloaded file and go to the nacos/bin folder(), And according to the actual situation of the operating system, execute the following command。[see reference for more detail](https://nacos.io/en-us/docs/quick-start.html)。
1. Linux/Unix/Mac , execute `sh startup.sh -m standalone`
1. Windows , execute `cmd startup.cmd`
### Start Application
1. Add necessary configurations to project `nacos-discovery-provider-example`, file /src/main/resources/application.properties.
spring.application.name=service-provider
server.port=18082
2. Start the application in IDE or by building a fatjar.
1. Start in IDE: Find main class `ProviderApplication ` in project `nacos-discovery-provider-example`, and execute the main method.
2. Build a fatjar:Execute command `mvn clean package` in project ` nacos-discovery-provider-example ` to build a fatjar,and run command `java -jar nacos-discovery-provider-example.jar` to start the application.
### Verification
#### Query Service
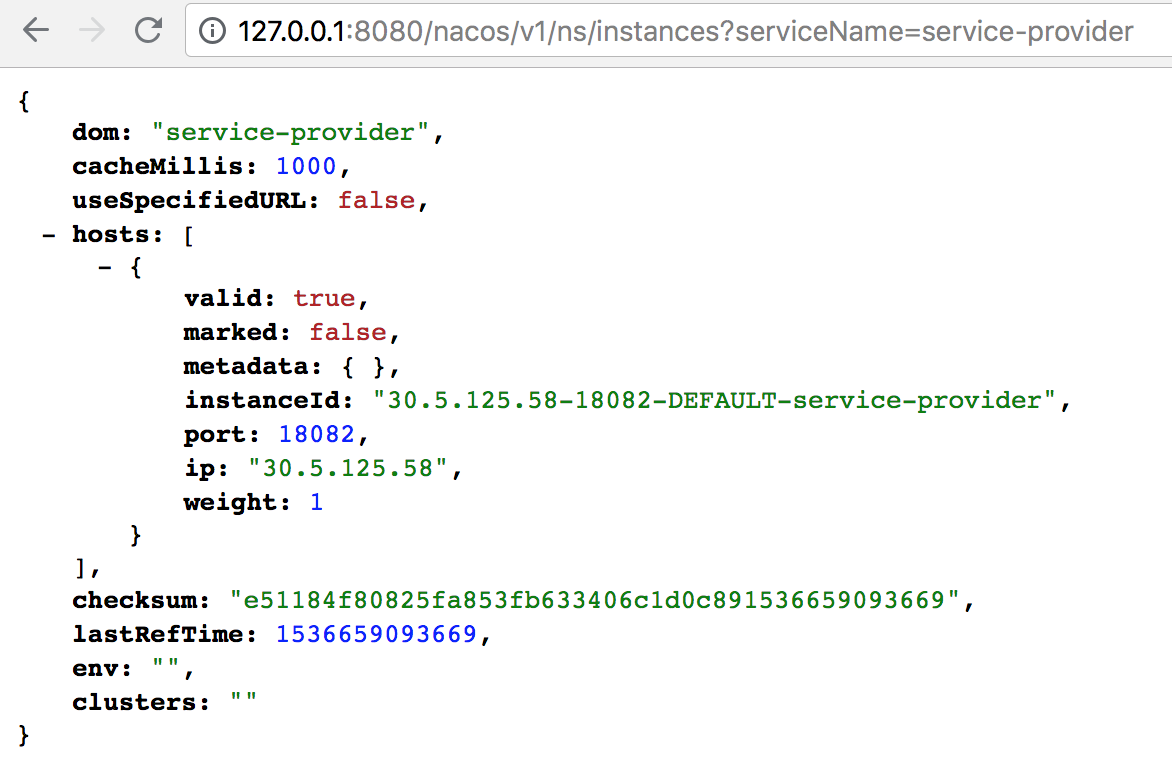
Enter `http://127.0.0.1:8848/nacos/v1/ns/instances?serviceName=service-provider` in the browser address bar and click Go to, we can see that the service node has been successfully registered to Nacos Server.
### Service Discovery
#### Integration Ribbon
For ease of use, NacosServerList implements the com.netflix.loadbalancer.ServerList interface and auto-injects under the @ConditionOnMissingBean condition. If you have customized requirements, you can implement your own ServerList yourself.
Nacos Discovery Starter integrates Ribbon by default, so for components that use Ribbon for load balancing, you can use Nacos Service discovery directly.
#### Use RestTemplate and FeignClient
The code of `nacos-discovery-consumer-example` project will be analyzed below, demonstrating how RestTemplate and FeignClient.
**Note This section is to show you how to connect to Nacos Discovery. The configurations have been completed in the following example, so you don't need modify the code any more.Only the contents related to Ribbon, RestTemplate, and FeignClient are involved here. If other service discovery components have been used, you can access Nacos Discovery by directly replacing the dependencies.**
1. Add the @LoadBlanced annotation to make RestTemplate accessible to the Ribbon
@Bean
@LoadBalanced
public RestTemplate restTemplate() {
return new RestTemplate();
}
1. FeignClient has integrated the Ribbon by default, which shows how to configure a FeignClient.
@FeignClient(name = "service-provider")
public interface EchoService {
@GetMapping(value = "/echo/{str}")
String echo(@PathVariable("str") String str);
}
Use the @FeignClient annotation to wrap the `EchoService` interface as a FeignClient with the attribute name corresponding to the service name `service-provider`.
The `@RequestMapping` annotation on the `echo` method corresponds the echo method to the URL `/echo/{str}`, and the `@PathVariable` annotation maps `{str}` in the URL path to the argument `str` of the echo method.
1. After completing the above configuration, injected them into the TestController.
@RestController
public class TestController {
@Autowired
private RestTemplate restTemplate;
@Autowired
private EchoService echoService;
@GetMapping(value = "/echo-rest/{str}")
public String rest(@PathVariable String str) {
return restTemplate.getForObject("http://service-provider/echo/" + str, String.class);
}
@GetMapping(value = "/echo-feign/{str}")
public String feign(@PathVariable String str) {
return echoService.echo(str);
}
}
1. Add necessary configurations to project `nacos-discovery-consumer-example` file /src/main/resources/application.properties.
spring.application.name=service-consumer
server.port=18083
1. Start the application in IDE or by building a fatjar.
1. Start in IDE: Find main class `ConsumerApplication ` in project `nacos-discovery-consumer-example`, and execute the main method.
2. Build a fatjar:Execute command `mvn clean package` in project ` nacos-discovery-consumer-example ` to build a fatjar,and run command `java -jar nacos-discovery-consumer-example.jar` to start the application.
#### Verification
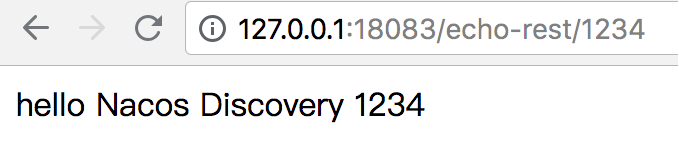
1. Enter `http://127.0.0.1:18083/echo-rest/1234` in the browser address bar and click Go to, we can see that the browser displays the message "hello Nacos Discovery 1234" returned by nacos-discovery-provider-example to prove that the service discovery is in effect.
1. Enter `http://127.0.0.1:18083/echo-feign/12345` in the browser address bar and click Go to, we can see that the browser displays the message "hello Nacos Discovery 12345" returned by nacos-discovery-provider-example to prove that the service discovery is in effect.

## Principle
### Service Registry
Spring Cloud Nacos Discovery follows the spring cloud common standard and implements three interfaces: AutoServiceRegistration, ServiceRegistry, and Registration.
During the startup phase of the spring cloud application, the WebServerInitializedEvent event is watched. When the WebServerInitializedEvent event is received after the Web container is initialized, the registration action is triggered, and the ServiceRegistry register method is called to register the service to the Nacos Server.
### Service Discovery
NacosServerList implements the com.netflix.loadbalancer.ServerList interface and auto-injects it under @ConditionOnMissingBean. The ribbon is integrated by default.
If you need to be more customizable, you can use @Autowired to inject a NacosRegistration bean and call the Nacos API directly through the contents of the NamingService field it holds.
## Endpoint
Nacos Discovery Starter also supports the implementation of Spring Boot actuator endpoints.
**Prerequisite:**
Add dependency spring-boot-starter-actuator to your pom.xml file, and configure your endpoint security strategy.
Spring Boot 1.x: Add configuration management.security.enabled=false
Spring Boot 2.x: Add configuration management.endpoints.web.exposure.include=*
To view the endpoint information, visit the following URLS:
Spring Boot1.x: Nacos Discovery Endpoint URL is http://127.0.0.1:18083/nacos_discovery.
Spring Boot2.x: Nacos Discovery Endpoint URL is http://127.0.0.1:18083/actuator/nacos-discovery.

As shown in the figure above, NacosDiscoveryProperties is the configuration of Nacos Discovery itself, and also includes the contents registered by the application, subscribe is the service information that the application has subscribed to.
## More
#### More configuration items
Configuration item|key|default value|Description
----|----|-----|-----
server address|spring.cloud.nacos.discovery.server-addr||
service|spring.cloud.nacos.discovery.service|spring.application.name|service id to registry
weight|spring.cloud.nacos.discovery.weight|1|value from 1 to 100, The larger the value, the larger the weight
ip|spring.cloud.nacos.discovery.ip||ip address to registry, Highest priority
network interface|spring.cloud.nacos.discovery.network-interface||When the IP is not configured, the registered IP address is the IP address corresponding to the network-interface. If this item is not configured, the address of the first network-interface is taken by default.
port|spring.cloud.nacos.discovery.port|-1|port to registry, Automatically detect without configuration
namesapce|spring.cloud.nacos.discovery.namespace||One of the common scenarios is the separation of the configuration of different environments, such as the development of the test environment and the resource isolation of the production environment.
AccessKey|spring.cloud.nacos.discovery.access-key||
SecretKey|spring.cloud.nacos.discovery.secret-key||
Metadata|spring.cloud.nacos.discovery.metadata||Extended data, Configure using Map format
log name|spring.cloud.nacos.discovery.log-name||
endpoint|spring.cloud.nacos.discovery.endpoint||The domain name of a service, through which the server address can be dynamically obtained.
Integration Ribbon|ribbon.nacos.enabled|true|
#### More introduction
[Nacos ](https://github.com/alibaba/Nacos) is committed to help you discover, configure, and manage your microservices. It provides a set of simple and useful features enabling you to realize dynamic service discovery, service configuration, service metadata and traffic management.
Nacos makes it easier and faster to construct, deliver and manage your microservices platform. It is the infrastructure that supports a service-centered modern application architecture with a microservices or cloud-native approach.
If you have any ideas or suggestions for Nacos Discovery starter, please don't hesitate to tell us by submitting github issues.