|
|
|
|
|
# Nacos Discovery Example
|
|
|
|
|
|
|
|
|
|
|
|
## 项目说明
|
|
|
|
|
|
|
|
|
|
|
|
本项目演示如何使用 Nacos Discovery Starter 完成 Spring Cloud 应用的服务注册与发现。
|
|
|
|
|
|
|
|
|
|
|
|
[Nacos](https://github.com/alibaba/Nacos) 是阿里巴巴开源的一个更易于构建云原生应用的动态服务发现、配置管理和服务管理平台。
|
|
|
|
|
|
|
|
|
|
|
|
## 示例
|
|
|
|
|
|
|
|
|
|
|
|
### 如何接入
|
|
|
|
|
|
在启动示例进行演示之前,我们先了解一下 Spring Cloud 应用如何接入 Nacos Discovery。
|
|
|
|
|
|
**注意 本章节只是为了便于您理解接入方式,本示例代码中已经完成接入工作,您无需再进行修改。**
|
|
|
|
|
|
|
|
|
|
|
|
1. 首先,修改 pom.xml 文件,引入 Nacos Discovery Starter。
|
|
|
|
|
|
|
|
|
|
|
|
<dependency>
|
|
|
|
|
|
<groupId>com.alibaba.cloud</groupId>
|
|
|
|
|
|
<artifactId>spring-cloud-starter-alibaba-nacos-discovery</artifactId>
|
|
|
|
|
|
</dependency>
|
|
|
|
|
|
|
|
|
|
|
|
2. 在应用的 /src/main/resources/application.properties 配置文件中配置 Nacos Server 地址
|
|
|
|
|
|
|
|
|
|
|
|
spring.cloud.nacos.discovery.server-addr=127.0.0.1:8848
|
|
|
|
|
|
|
|
|
|
|
|
3. 使用 @EnableDiscoveryClient 注解开启服务注册与发现功能
|
|
|
|
|
|
|
|
|
|
|
|
@SpringBootApplication
|
|
|
|
|
|
@EnableDiscoveryClient
|
|
|
|
|
|
public class ProviderApplication {
|
|
|
|
|
|
|
|
|
|
|
|
public static void main(String[] args) {
|
|
|
|
|
|
SpringApplication.run(Application.class, args);
|
|
|
|
|
|
}
|
|
|
|
|
|
|
|
|
|
|
|
@RestController
|
|
|
|
|
|
class EchoController {
|
|
|
|
|
|
@GetMapping(value = "/echo/{string}")
|
|
|
|
|
|
public String echo(@PathVariable String string) {
|
|
|
|
|
|
return string;
|
|
|
|
|
|
}
|
|
|
|
|
|
}
|
|
|
|
|
|
}
|
|
|
|
|
|
|
|
|
|
|
|
### 启动 Nacos Server
|
|
|
|
|
|
|
|
|
|
|
|
1. 首先需要获取 Nacos Server,支持直接下载和源码构建两种方式。
|
|
|
|
|
|
|
|
|
|
|
|
1. 直接下载:[Nacos Server 下载页](https://github.com/alibaba/nacos/releases)
|
|
|
|
|
|
2. 源码构建:进入 Nacos [Github 项目页面](https://github.com/alibaba/nacos),将代码 git clone 到本地自行编译打包,[参考此文档](https://nacos.io/zh-cn/docs/quick-start.html)。**推荐使用源码构建方式以获取最新版本**
|
|
|
|
|
|
|
|
|
|
|
|
2. 启动 Server,进入解压后文件夹或编译打包好的文件夹,找到如下相对文件夹 nacos/bin,并对照操作系统实际情况之下如下命令。
|
|
|
|
|
|
|
|
|
|
|
|
1. Linux/Unix/Mac 操作系统,执行命令 `sh startup.sh -m standalone`
|
|
|
|
|
|
1. Windows 操作系统,执行命令 `cmd startup.cmd`
|
|
|
|
|
|
|
|
|
|
|
|
### 应用启动
|
|
|
|
|
|
|
|
|
|
|
|
1. 增加配置,在 nacos-discovery-provider-example 项目的 /src/main/resources/application.properties 中添加基本配置信息
|
|
|
|
|
|
|
|
|
|
|
|
spring.application.name=service-provider
|
|
|
|
|
|
server.port=18082
|
|
|
|
|
|
|
|
|
|
|
|
|
|
|
|
|
|
2. 启动应用,支持 IDE 直接启动和编译打包后启动。
|
|
|
|
|
|
|
|
|
|
|
|
1. IDE直接启动:找到 nacos-discovery-provider-example 项目的主类 `ProviderApplication`,执行 main 方法启动应用。
|
|
|
|
|
|
2. 打包编译后启动:在 nacos-discovery-provider-example 项目中执行 `mvn clean package` 将工程编译打包,然后执行 `java -jar nacos-discovery-provider-example.jar`启动应用。
|
|
|
|
|
|
|
|
|
|
|
|
### 验证
|
|
|
|
|
|
|
|
|
|
|
|
#### 查询服务
|
|
|
|
|
|
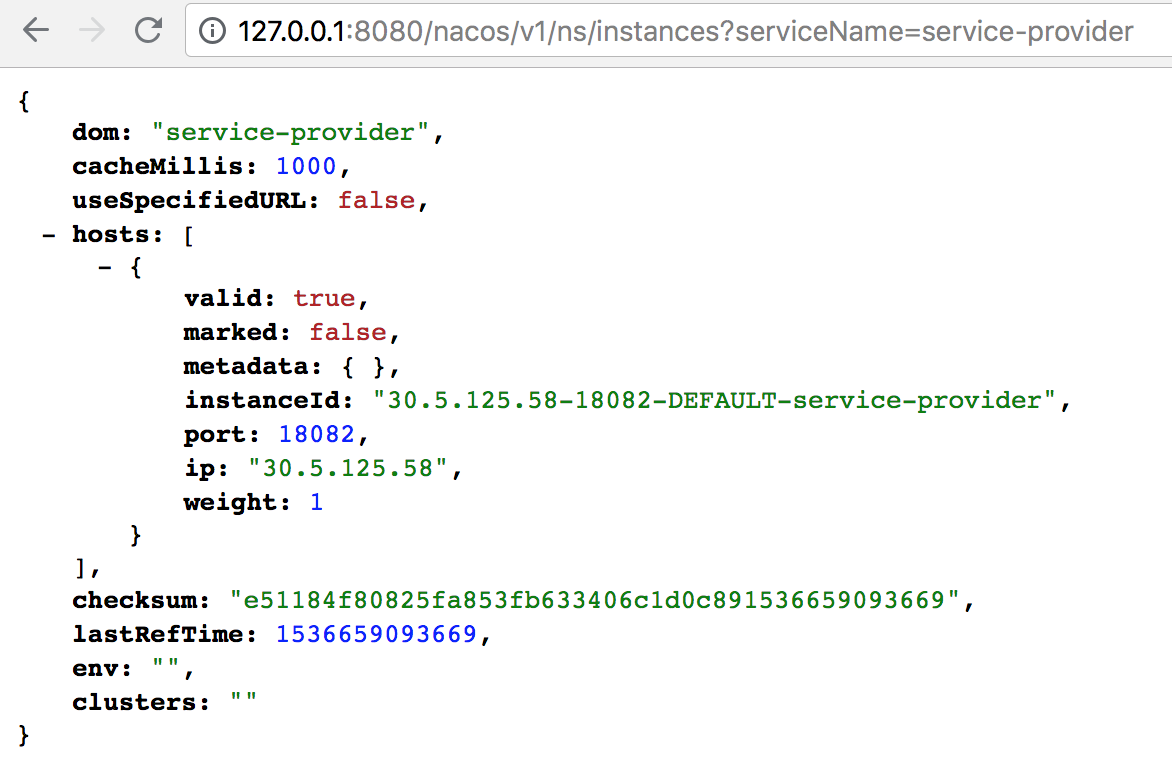
在浏览器输入此地址 `http://127.0.0.1:8848/nacos/v1/ns/catalog/instances?serviceName=service-provider&clusterName=DEFAULT&pageSize=10&pageNo=1&namespaceId=`,并点击跳转,可以看到服务节点已经成功注册到 Nacos Server。
|
|
|
|
|
|
|
|
|
|
|
|
|
|
|
|
|
|
|
|
|
|
|
|
|
|
|
|
|
|
### 服务发现
|
|
|
|
|
|
|
|
|
|
|
|
|
|
|
|
|
|
#### 集成 Ribbon
|
|
|
|
|
|
为了便于使用,NacosServerList 实现了 com.netflix.loadbalancer.ServerList<Server> 接口,并在 @ConditionOnMissingBean 的条件下进行自动注入。如果您有定制化的需求,可以自己实现自己的 ServerList。
|
|
|
|
|
|
|
|
|
|
|
|
Nacos Discovery Starter 默认集成了 Ribbon ,所以对于使用了 Ribbon 做负载均衡的组件,可以直接使用 Nacos 的服务发现。
|
|
|
|
|
|
|
|
|
|
|
|
|
|
|
|
|
|
#### 使用 RestTemplate 和 FeignClient
|
|
|
|
|
|
|
|
|
|
|
|
下面将分析 nacos-discovery-consumer-example 项目的代码,演示如何 RestTemplate 与 FeignClient。
|
|
|
|
|
|
|
|
|
|
|
|
**注意 本章节只是为了便于您理解接入方式,本示例代码中已经完成接入工作,您无需再进行修改。此处只涉及Ribbon、RestTemplate、FeignClient相关的内容,如果已经使用了其他服务发现组件,可以通过直接替换依赖来接入 Nacos Discovery。**
|
|
|
|
|
|
|
|
|
|
|
|
1. 添加 @LoadBlanced 注解,使得 RestTemplate 接入 Ribbon
|
|
|
|
|
|
|
|
|
|
|
|
@Bean
|
|
|
|
|
|
@LoadBalanced
|
|
|
|
|
|
public RestTemplate restTemplate() {
|
|
|
|
|
|
return new RestTemplate();
|
|
|
|
|
|
}
|
|
|
|
|
|
|
|
|
|
|
|
1. FeignClient 已经默认集成了 Ribbon ,此处演示如何配置一个 FeignClient。
|
|
|
|
|
|
|
|
|
|
|
|
@FeignClient(name = "service-provider")
|
|
|
|
|
|
public interface EchoService {
|
|
|
|
|
|
@GetMapping(value = "/echo/{str}")
|
|
|
|
|
|
String echo(@PathVariable("str") String str);
|
|
|
|
|
|
}
|
|
|
|
|
|
|
|
|
|
|
|
使用 @FeignClient 注解将 EchoService 这个接口包装成一个 FeignClient,属性 name 对应服务名 service-provider。
|
|
|
|
|
|
|
|
|
|
|
|
echo 方法上的 @RequestMapping 注解将 echo 方法与 URL "/echo/{str}" 相对应,@PathVariable 注解将 URL 路径中的 `{str}` 对应成 echo 方法的参数 str。
|
|
|
|
|
|
|
|
|
|
|
|
1. 完成以上配置后,将两者自动注入到 TestController 中。
|
|
|
|
|
|
|
|
|
|
|
|
@RestController
|
|
|
|
|
|
public class TestController {
|
|
|
|
|
|
|
|
|
|
|
|
@Autowired
|
|
|
|
|
|
private RestTemplate restTemplate;
|
|
|
|
|
|
@Autowired
|
|
|
|
|
|
private EchoService echoService;
|
|
|
|
|
|
|
|
|
|
|
|
@GetMapping(value = "/echo-rest/{str}")
|
|
|
|
|
|
public String rest(@PathVariable String str) {
|
|
|
|
|
|
return restTemplate.getForObject("http://service-provider/echo/" + str, String.class);
|
|
|
|
|
|
}
|
|
|
|
|
|
@GetMapping(value = "/echo-feign/{str}")
|
|
|
|
|
|
public String feign(@PathVariable String str) {
|
|
|
|
|
|
return echoService.echo(str);
|
|
|
|
|
|
}
|
|
|
|
|
|
}
|
|
|
|
|
|
|
|
|
|
|
|
1. 配置必要的配置,在 nacos-discovery-consumer-example 项目的 /src/main/resources/application.properties 中添加基本配置信息
|
|
|
|
|
|
|
|
|
|
|
|
spring.application.name=service-consumer
|
|
|
|
|
|
server.port=18083
|
|
|
|
|
|
|
|
|
|
|
|
1. 启动应用,支持 IDE 直接启动和编译打包后启动。
|
|
|
|
|
|
|
|
|
|
|
|
1. IDE直接启动:找到 nacos-discovery-consumer-example 项目的主类 `ConsumerApplication`,执行 main 方法启动应用。
|
|
|
|
|
|
2. 打包编译后启动:在 nacos-discovery-consumer-example 项目中执行 `mvn clean package` 将工程编译打包,然后执行 `java -jar nacos-discovery-consumer-example.jar`启动应用。
|
|
|
|
|
|
|
|
|
|
|
|
#### 验证
|
|
|
|
|
|
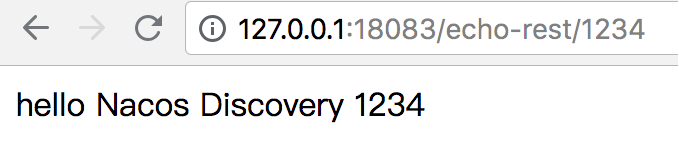
1. 在浏览器地址栏中输入 http://127.0.0.1:18083/echo-rest/1234,点击跳转,可以看到浏览器显示了 nacos-discovery-provider-example 返回的消息 "hello Nacos Discovery 1234",证明服务发现生效。
|
|
|
|
|
|
|
|
|
|
|
|
|
|
|
|
|
|
|
|
|
|
|
|
1. 在浏览器地址栏中输入 http://127.0.0.1:18083/echo-feign/12345,点击跳转,可以看到浏览器显示 nacos-discovery-provider-example 返回的消息 "hello Nacos Discovery 12345",证明服务发现生效。
|
|
|
|
|
|
|
|
|
|
|
|

|
|
|
|
|
|
## 原理
|
|
|
|
|
|
|
|
|
|
|
|
|
|
|
|
|
|
### 服务注册
|
|
|
|
|
|
Spring Cloud Nacos Discovery 遵循了 spring cloud common 标准,实现了 AutoServiceRegistration、ServiceRegistry、Registration 这三个接口。
|
|
|
|
|
|
|
|
|
|
|
|
在 spring cloud 应用的启动阶段,监听了 WebServerInitializedEvent 事件,当Web容器初始化完成后,即收到 WebServerInitializedEvent 事件后,会触发注册的动作,调用 ServiceRegistry 的 register 方法,将服务注册到 Nacos Server。
|
|
|
|
|
|
|
|
|
|
|
|
|
|
|
|
|
|
|
|
|
|
|
|
### 服务发现
|
|
|
|
|
|
NacosServerList 实现了 com.netflix.loadbalancer.ServerList<Server> 接口,并在 @ConditionOnMissingBean 的条件下进行自动注入,默认集成了Ribbon。
|
|
|
|
|
|
|
|
|
|
|
|
如果需要有更加自定义的可以使用 @Autowired 注入一个 NacosRegistration 实例,通过其持有的 NamingService 字段内容直接调用 Nacos API。
|
|
|
|
|
|
|
|
|
|
|
|
|
|
|
|
|
|
## Endpoint 信息查看
|
|
|
|
|
|
|
|
|
|
|
|
Spring Boot 应用支持通过 Endpoint 来暴露相关信息,Nacos Discovery Starter 也支持这一点。
|
|
|
|
|
|
|
|
|
|
|
|
在使用之前需要在 maven 中添加 `spring-boot-starter-actuator`依赖,并在配置中允许 Endpoints 的访问。
|
|
|
|
|
|
|
|
|
|
|
|
* Spring Boot 1.x 中添加配置 management.security.enabled=false
|
|
|
|
|
|
* Spring Boot 2.x 中添加配置 management.endpoints.web.exposure.include=*
|
|
|
|
|
|
|
|
|
|
|
|
Spring Boot 1.x 可以通过访问 http://127.0.0.1:18083/nacos_discovery 来查看 Nacos Endpoint 的信息。
|
|
|
|
|
|
|
|
|
|
|
|
Spring Boot 2.x 可以通过访问 http://127.0.0.1:18083/actuator/nacos-discovery 来访问。
|
|
|
|
|
|
|
|
|
|
|
|

|
|
|
|
|
|
|
|
|
|
|
|
如上图所示,NacosDiscoveryProperties 则为 Spring Cloud Nacos Discovery 本身的配置,也包括本机注册的内容,subscribe 为本机已订阅的服务信息。
|
|
|
|
|
|
|
|
|
|
|
|
## More
|
|
|
|
|
|
|
|
|
|
|
|
#### 更多配置项
|
|
|
|
|
|
配置项|key|默认值|说明
|
|
|
|
|
|
----|----|-----|-----
|
|
|
|
|
|
服务端地址|spring.cloud.nacos.discovery.server-addr||
|
|
|
|
|
|
服务名|spring.cloud.nacos.discovery.service|spring.application.name|
|
|
|
|
|
|
权重|spring.cloud.nacos.discovery.weight|1|取值范围 1 到 100,数值越大,权重越大
|
|
|
|
|
|
网卡名|spring.cloud.nacos.discovery.network-interface||当IP未配置时,注册的IP为此网卡所对应的IP地址,如果此项也未配置,则默认取第一块网卡的地址
|
|
|
|
|
|
注册的IP地址|spring.cloud.nacos.discovery.ip||优先级最高
|
|
|
|
|
|
注册的端口|spring.cloud.nacos.discovery.port|-1|默认情况下不用配置,会自动探测
|
|
|
|
|
|
命名空间|spring.cloud.nacos.discovery.namespace||常用场景之一是不同环境的注册的区分隔离,例如开发测试环境和生产环境的资源(如配置、服务)隔离等。
|
|
|
|
|
|
AccessKey|spring.cloud.nacos.discovery.access-key||
|
|
|
|
|
|
SecretKey|spring.cloud.nacos.discovery.secret-key||
|
|
|
|
|
|
Metadata|spring.cloud.nacos.discovery.metadata||使用Map格式配置
|
|
|
|
|
|
日志文件名|spring.cloud.nacos.discovery.log-name||
|
|
|
|
|
|
接入点|spring.cloud.nacos.discovery.endpoint|UTF-8|地域的某个服务的入口域名,通过此域名可以动态地拿到服务端地址
|
|
|
|
|
|
是否集成Ribbon|ribbon.nacos.enabled|true|
|
|
|
|
|
|
|
|
|
|
|
|
|
|
|
|
|
|
|
|
|
|
|
|
#### 更多介绍
|
|
|
|
|
|
Nacos为用户提供包括动态服务发现,配置管理,服务管理等服务基础设施,帮助用户更灵活,更轻松地构建,交付和管理他们的微服务平台,基于Nacos, 用户可以更快速的构建以“服务”为中心的现代云原生应用。Nacos可以和Spring Cloud、Kubernetes/CNCF、Dubbo 等微服务生态无缝融合,为用户提供更卓越的体验。更多 Nacos 相关的信息,请参考 [Nacos 项目](https://github.com/alibaba/Nacos)。
|
|
|
|
|
|
|
|
|
|
|
|
如果您对 Spring Cloud Nacos Discovery 有任何建议或想法,欢迎在 issue 中或者通过其他社区渠道向我们提出。
|
|
|
|
|
|
|